

How To Repair Subfloor In Bathroom
You can end rot hands, but repairing the damage may call for nothing brusk of surgery.
Unlike typical home ills such as broken windows, fading paint, and sagging doors, infestations of rot in floors aren't obvious. You lot might not fifty-fifty notice the problem until you feel a soft spot in the floor, hear a suspicious squish as you step downward, or find your toilet tilting and beginning to stone from side to side. Y'all as well might run across telltale brown stains showing upwards on the floor surface.
Unfortunately, by this fourth dimension, the rot has already done some damage, so a complete cure requires ii tasks. Start, you have to eliminate the conditions that caused it — moisture in wood. And second, you'll have to replace any weakened wood.
Your floor can go moisture in many ways, but yous won't have to worry near almost of them. Occasional spills, and puddles left from wet feet and floor washing won't cause trouble, because they soon dry up. Rather, expect for sources that regularly wet the flooring and never give it a adventure to dry out. That's what causes rot. It about frequently occurs around leaky pipes or drains, showers and bathtubs, and toilets.
You might think that replacing the rotted wood would exist easy — simply cutting out the damage and patch it. But unfortunately, rot ordinarily occurs in hard-to-achieve places — under the toilet, next to the vanity, nether the kitchen sink or along a wall. The chore gets tougher when radiators, sinks or other fixtures have to exist moved.
Complications also increment when rot extends under walls and weakens the supporting structure of your house. If these repairs are beyond your ability, information technology's vital that you telephone call your edifice inspector and ask how best to proceed.
Is floor replacement a big chore?
In this story you'll see how to repair the rotted floor around a toilet. The rot was acquired by 2 moisture sources:
- condensation running off the cool basin and tank onto the floor during humid summer days, and
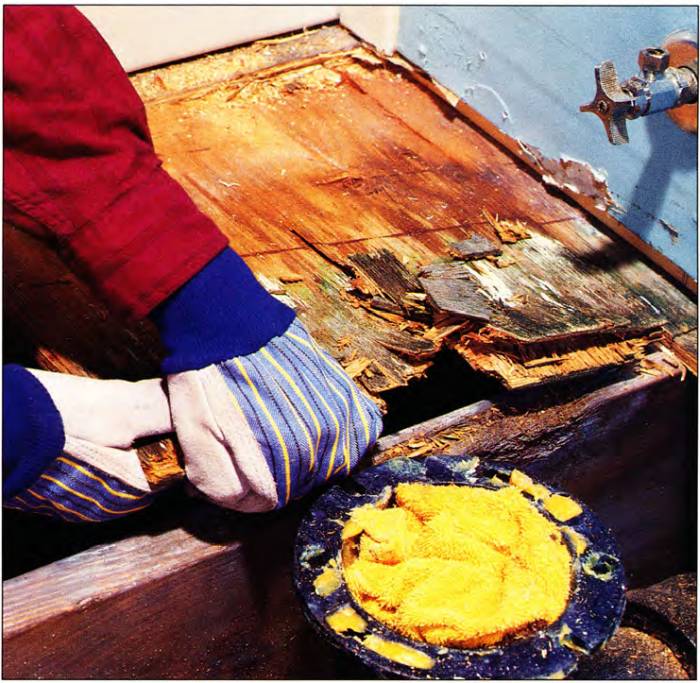
- an one-time leaky seal between the toilet and its soil pipage (Photo ane).
If the signs of moisture around the toilet base were ignored early on and reset the toilet with a new wax ring and solved the tank sweating problem, information technology would have been possible to avoid trouble. No wet, no rot. It's that simple.
But with the damage done, now it's necessary to tear out and replace the rotted wood floor.
A novice tin complete the carpentry in this project with a circular saw, jigsaw, and a one/2 in. variable speed drill for driving screws. You can remove and reset the toilet with an adjustable wrench. Because you'll exist removing the bath fixtures, repairing the rot and laying a new floor, you can expect your bathroom to be out of action for about ii days.
Even so, if there are leaks in the toilet drain line (Photograph 5) or if it needs replacement, the projection will become more complicated. You'll need to consult or hire a professional plumber to make sure your drain connections are leak-proof.
Getting rid of the rot
To get at the rot problem in this bathroom, it was necessary to remove the vanity and toilet. To practice this, first shut off the valves where the water supply pipes emerge from the wall and then disconnect the feed tubes. If your bathroom fixtures don't accept valves, shut off the entire house'due south supply at the water primary. Then turn on your sink faucets to allow the water force per unit area to release, earlier un-hooking the connections nether the sink.
You lot tin can remove the toilet past un-screwing the concur-downwards basics on either side of the base and lifting information technology up (Photo 1). Be sure to flush it showtime, though, to empty the water from the tank, and so sponge out the excess.

Remove the toilet and other obstructions similar the vanity to expose the floor and make work easier.
With the floor cleared for action, you tin can now probe it with a screwdriver to discover the soft spots and plan your strategy (Photograph 2). Most floors take two layers of wood: an underlayment over a subfloor. The subfloor usually runs in a continuous sheet nether all the walls. It can't be removed hands. The underlayment, yet, was put in afterwards the walls were up, so information technology fits each room and is tailored to the blazon of floor covering existence used. The underlayment, therefore, is like shooting fish in a barrel to pull up and remove.

Probe for soft spots in the wood floor with a screwdriver, removing tile as you go, to find the extent of the rot impairment.
In this case it was decided to replace both the underlayment and the floor tile in the unabridged bathroom. The tile was in poor shape, the patch would have had to exist large, and we couldn't make a practiced color match anyway. Plus, it would take too long to smooth and prepare the old underlayment for new tile.
To remove the underlayment, we had to saw through it (but not through the subfloor!) along the tub (Photo three), since it extended underneath. And so it was raised upwards with a pry bar.
Removing rot is a dirty business organization, and so put on your gloves when you lot assault information technology. Also, stuff a rag into the toilet flange (Photo 4) to keep sewer gas from escaping into your house and to keep debris from falling down the drain.

Cutting through the vinyl and underlayment along the tub with your power saw, finishing the cut with a chisel at the ends. Then pull up the entire underlayment and vinyl. Probe again with a screwdriver to determine the extent of rot damage to the subfloor. When cutting out the rotten sections, plan the saw cuts so they fall on the center of joists.
Repairing the floor
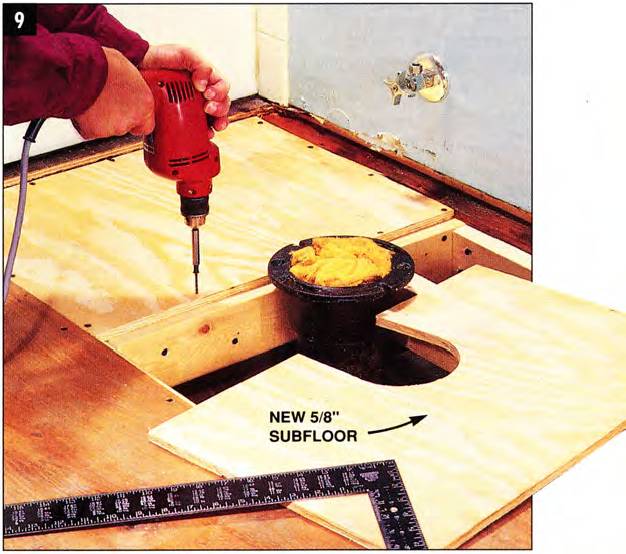
With the underlayment gone, you tin now appraise the damage to the subfloor and remove the rotted section. Working effectually the toilet flange is always tricky, because you accept to shove your new subfloor and underlayment nether it to give it adequate support.
If you remove the old flange, though, you'll have to do some complicated plumbing to reinstall it. Utilize a jigsaw to cutting out the circles as shown in Photos 9, 10, and 11 to make the floor fit under the flange.

Remove the subfloor section to eliminate all soft, rotting wood. Pull nails before cut along joists. Let rotted areas to dry out, then use a coat of woods preservative to damaged and discolored areas.
If yous've had a recurring leak, your flooring joists might be rotted and weakened, likewise. In that case, y'all'll take to insert an entirely new joist and screw it to the solid wood of the old one. This tin exist a big project – you may have to open more than floor to insert the new joist, move electric or plumbing runs, or raise a sagging flooring. If you're unfamiliar with these complications, hire a professional carpenter to help out.
Fortunately, this project's joist rot caused only modest surface damage. which was repaired by screwing a 2x4 to the joist to provide a sound peak edge (Photo seven).

Fasten a 2x4 to the damaged joist with 3-in. galvanized drywall screws to supply a solid, flat nailing surface. Toenail or screw 2x4 blocks to the joists to support the edges of the subfloor and the waste flange.
Fasten the new subfloor patch in identify, screwing all edges, including the one-time flooring, to joists and 2x4 blocks. Use 1-1/2 in. screws spaced every 6 in.
Afterward patching the subfloor and restoring the underlayment every bit shown in the photos, it was time to gum and nail down a 2d very thin underlayment (ane/4 in.) to clinch a perfectly smooth surface for the vinyl floor.
TIP: When you buy thin textile, make certain you go underlayment-course plywood, which is ameliorate than regular grades.
Yous'll get a smoother, stronger floor if yous stagger your seams along different joists, so the edges of one layer don't fall direct over those of some other. Vinyl floors bear witness all faults and irregularities beneath them, so the rough joint between the old and new underlayment forth the bathtub would take shown through and looked bad if it weren't covered. However, other floor coverings, like ceramic tile, won't need that extra i/4 in. underlayment.
You tin't always become away with adding extra layers to your floor without adjusting the toilet flange, though. In this case the 1/4-in. underlayment was laid around the flange, not underneath, because information technology wasn't possible to raise the flange above its onetime acme.
The wax ring put on the toilet still sealed the toilet to the flange, but it wouldn't have if the floor had been congenital up much college. This is an important detail to confirm in advance when deciding on your new floor covering.
Solutions to a sweating toilet
Next time y'all see a puddle of water underneath the toilet on a hot and boiling day, don't automatically blame your toddler. Bank check the outside of the tank and toilet to meet if "sweat" is running down the sides and onto the floor.
Of class, toilets don't actually sweat; h2o doesn't seep through their impervious glazed-prc walls. The chaplet of water are condensation caused by humid air meeting the absurd toilet sides.
Unremarkably the toilet would be at room temperature, the same temperature every bit air. Just when the toilet's used frequently, cool water from the h2o supply underground can cool both the tank and bowl. That'southward why on a humid summer twenty-four hours yous'll oft find chaplet of "sweat" building upwards and dripping to the floor. Of course, as the tank and bowl warm to room temperature, the condensation will evaporate.
Occasional sweating does no harm, but persistent condensation volition continually wet the floor and allow rot to begin. Information technology also weakens the glue nether the tile and causes plywood to delaminate. Surprisingly, the best solutions aren't all that unproblematic:
- You can reduce the humidity level in your house with a dehumidifier or air conditioner, but that's expensive if your only goal is to end toilet condensation.
- You can gum a sparse foam liner to the inside of your tank to insulate it. It works well and information technology'south cheap. It used to exist complicated to install, but now y'all don't fifty-fifty have to bear on the tank mechanisms, you can work effectually them. Also, if yous buy a new toilet, you can become one that includes a liner.
- You lot can hook a hot-h2o line to the cold through an adjustable "anti-sweat" valve, letting you warm the tank h2o during warm, humid conditions. The valve costs $forty and requires that you run a hot-water feed line.
- Insulate your tank with a tank cover. Y'all can find these where yous buy linens, matched to your towels or rug. Wash them often to keep them sanitary.
- But lay a towel under the tank to soak upwards moisture, if it only occurs a few times a yr.
The DIYer will probably find the tank liner easier to install than the valve. After the initial piece of work, it requires no maintenance and no additional expenses. Click hither to buy the tank liner now.
To install an anti-sweat valve you take to run a hot-water line from the nearby sink hot-h2o supply. Then you have to adjust the hot/cold water mix as needed. Of course, yous'll pay a small-scale energy cost to heat the water. You can discover the anti-sweat toilet tank mixing valve here.
Yous can stop rot easily, but repairing the damage may call for nothing brusque of surgery.
Unlike typical home ills such as cleaved windows, fading pigment, and sagging doors, infestations of rot in floors aren't obvious. You might not even detect the problem until you feel a soft spot in the flooring, hear a suspicious squish as yous pace down, or discover your toilet tilting and get-go to rock from side to side. You as well might see telltale brown stains showing upward on the floor surface.
Unfortunately, by this time, the rot has already done some impairment, so a complete cure requires 2 tasks. Start, yous have to eliminate the weather that acquired it — moisture in wood. And second, y'all'll have to supplant any weakened wood.
Your floor can become moisture in many ways, but you won't have to worry well-nigh most of them. Occasional spills, and puddles left from wet feet and floor washing won't cause trouble, because they soon dry upward. Rather, expect for sources that regularly wet the floor and never requite it a chance to dry out out. That'due south what causes rot. It most frequently occurs around leaky pipes or drains, showers and bathtubs, and toilets.
You lot might recall that replacing the rotted wood would be easy — just cut out the harm and patch it. But unfortunately, rot commonly occurs in hard-to-reach places — under the toilet, next to the vanity, under the kitchen sink or forth a wall. The job gets tougher when radiators, sinks or other fixtures accept to exist moved.
Complications also increase when rot extends under walls and weakens the supporting construction of your business firm. If these repairs are beyond your ability, it'southward vital that yous call your building inspector and ask how best to proceed.
Is floor replacement a big job?
In this story yous'll meet how to repair the rotted floor effectually a toilet. The rot was acquired by two moisture sources:
- condensation running off the cool bowl and tank onto the floor during humid summer days, and
- an old leaky seal between the toilet and its soil piping (Photo 1).
If the signs of moisture around the toilet base were ignored early on and reset the toilet with a new wax ring and solved the tank sweating trouble, it would take been possible to avoid trouble. No wet, no rot. It's that elementary.
Merely with the damage done, at present it's necessary to tear out and supersede the rotted wood flooring.
A novice can complete the carpentry in this project with a circular saw, jigsaw, and a 1/2 in. variable speed drill for driving screws. Yous tin can remove and reset the toilet with an adjustable wrench. Because you'll be removing the bathroom fixtures, repairing the rot and laying a new floor, you can expect your bath to be out of activeness for about two days.
Yet, if there are leaks in the toilet drain line (Photograph 5) or if it needs replacement, the project will get more complicated. You'll need to consult or hire a professional plumber to make sure your drain connections are leak-proof.
Getting rid of the rot
To get at the rot trouble in this bath, it was necessary to remove the vanity and toilet. To practice this, first shut off the valves where the h2o supply pipes emerge from the wall and then disconnect the feed tubes. If your bath fixtures don't accept valves, close off the entire house'southward supply at the water main. Then turn on your sink faucets to allow the water pressure to release, before un-hooking the connections under the sink.
Y'all tin can remove the toilet by un-screwing the hold-downwardly nuts on either side of the base of operations and lifting it upwards (Photo 1). Be certain to flush it starting time, though, to empty the water from the tank, and then sponge out the backlog.
Remove the toilet and other obstructions like the vanity to expose the floor and brand work easier.
With the floor cleared for activity, you lot tin can now probe it with a screwdriver to find the soft spots and plan your strategy (Photo 2). Virtually floors accept two layers of wood: an underlayment over a subfloor. The subfloor unremarkably runs in a continuous canvass under all the walls. It tin't be removed easily. The underlayment, however, was put in after the walls were up, so it fits each room and is tailored to the type of floor covering being used. The underlayment, therefore, is easy to pull upward and remove.
Probe for soft spots in the forest floor with a screwdriver, removing tile every bit you go, to find the extent of the rot harm.
In this example it was decided to replace both the underlayment and the floor tile in the entire bathroom. The tile was in poor shape, the patch would have had to be large, and we couldn't make a good color match anyway. Plus, it would accept as well long to smoothen and prepare the old underlayment for new tile.
To remove the underlayment, we had to saw through it (merely not through the subfloor!) along the tub (Photo 3), since it extended underneath. Then it was raised up with a pry bar.
Removing rot is a dirty business organization, so put on your gloves when you attack information technology. As well, stuff a rag into the toilet flange (Photograph 4) to keep sewer gas from escaping into your house and to keep droppings from falling down the drain.
Cut through the vinyl and underlayment along the tub with your power saw, finishing the cut with a chisel at the ends. Then pull upwardly the entire underlayment and vinyl. Probe once more with a screwdriver to determine the extent of rot damage to the subfloor. When cutting out the rotten sections, programme the saw cuts and so they fall on the center of joists.
Repairing the floor
With the underlayment gone, you tin now assess the harm to the subfloor and remove the rotted department. Working around the toilet flange is always tricky, because you lot have to shove your new subfloor and underlayment under it to give information technology adequate support.
If you remove the old flange, though, you'll have to do some complicated plumbing to reinstall it. Employ a jigsaw to cut out the circles as shown in Photos 9, x, and 11 to brand the floor fit nether the flange.
Remove the subfloor section to eliminate all soft, rotting wood. Pull nails before cutting along joists. Allow rotted areas to dry out out, and so use a glaze of wood preservative to damaged and discolored areas.
If you lot've had a recurring leak, your floor joists might be rotted and weakened, too. In that instance, you'll take to insert an entirely new joist and screw it to the solid wood of the old ane. This can exist a large project – you may accept to open up more floor to insert the new joist, move electrical or plumbing runs, or raise a sagging floor. If yous're unfamiliar with these complications, hire a professional person carpenter to help out.
Fortunately, this project's joist rot caused only minor surface damage. which was repaired by screwing a 2x4 to the joist to provide a sound top edge (Photo 7).
Fasten a 2x4 to the damaged joist with iii-in. galvanized drywall screws to supply a solid, flat nailing surface. Toenail or screw 2x4 blocks to the joists to support the edges of the subfloor and the waste product flange.
Fasten the new subfloor patch in identify, screwing all edges, including the old flooring, to joists and 2x4 blocks. Apply one-1/2 in. screws spaced every half-dozen in.
After patching the subfloor and restoring the underlayment as shown in the photos, it was fourth dimension to mucilage and nail downwards a second very sparse underlayment (1/4 in.) to assure a perfectly smooth surface for the vinyl flooring.
TIP: When yous buy thin material, make certain y'all get underlayment-course plywood, which is amend than regular grades.
You'll go a smoother, stronger floor if you stagger your seams forth different joists, then the edges of ane layer don't fall directly over those of some other. Vinyl floors prove all faults and irregularities beneath them, so the rough joint betwixt the old and new underlayment forth the bathtub would take shown through and looked bad if it weren't covered. However, other floor coverings, like ceramic tile, won't need that actress 1/4 in. underlayment.
You tin can't always get abroad with adding extra layers to your flooring without adjusting the toilet flange, though. In this case the 1/four-in. underlayment was laid around the flange, non underneath, considering it wasn't possible to raise the flange above its quondam meridian.
The wax ring put on the toilet however sealed the toilet to the flange, but it wouldn't have if the flooring had been built up much college. This is an important particular to confirm in accelerate when deciding on your new floor covering.
Solutions to a sweating toilet
Side by side time you lot see a puddle of water underneath the toilet on a hot and humid mean solar day, don't automatically blame your toddler. Bank check the outside of the tank and toilet to encounter if "sweat" is running downwards the sides and onto the flooring.
Of course, toilets don't really sweat; water doesn't seep through their impervious glazed-cathay walls. The beads of water are condensation acquired by boiling air meeting the cool toilet sides.
Normally the toilet would exist at room temperature, the aforementioned temperature as air. But when the toilet's used frequently, cool water from the water supply surreptitious can absurd both the tank and bowl. That's why on a humid summer day you'll often find chaplet of "sweat" building up and dripping to the floor. Of course, as the tank and bowl warm to room temperature, the condensation will evaporate.
Occasional sweating does no harm, but persistent condensation will continually moisture the flooring and let rot to begin. Information technology also weakens the glue under the tile and causes plywood to delaminate. Surprisingly, the all-time solutions aren't all that elementary:
- Yous tin can reduce the humidity level in your house with a dehumidifier or air conditioner, simply that's expensive if your merely goal is to stop toilet condensation.
- You lot can mucilage a thin foam liner to the inside of your tank to insulate it. It works well and it'south cheap. It used to exist complicated to install, but at present you don't even have to impact the tank mechanisms, you tin work around them. Also, if y'all buy a new toilet, y'all tin can become one that includes a liner.
- You can hook a hot-water line to the cold through an adjustable "anti-sweat" valve, letting you lot warm the tank water during warm, humid atmospheric condition. The valve costs $xl and requires that you run a hot-water feed line.
- Insulate your tank with a tank encompass. Yous can notice these where you buy linens, matched to your towels or carpet. Launder them often to keep them sanitary.
- Simply lay a towel under the tank to soak up wet, if it simply occurs a few times a twelvemonth.
The DIYer will probably observe the tank liner easier to install than the valve. After the initial piece of work, it requires no maintenance and no boosted expenses. Click hither to buy the tank liner now.
To install an anti-sweat valve yous have to run a hot-h2o line from the nearby sink hot-water supply. And so you have to suit the hot/common cold water mix as needed. Of grade, yous'll pay a small energy price to estrus the water. You lot tin find the anti-sweat toilet tank mixing valve here.

Source: https://bestlife52.com/home/replace-subfloor/
Posted by: valdezcaceneviver.blogspot.com
0 Response to "How To Repair Subfloor In Bathroom"
Post a Comment